Aadhaar- a word that we hear now and then in our daily lives. Well, the literal meaning of Aadhaar is the foundation, and yet it stands true when the Aadhaar project was introduced in India, to have a strong foundation of identification of individuals, equality in distribution, efficient service delivery and many more. The purpose of the project is to capture biometric information like photograph, iris-scan, fingerprints and demographic data of the Indian residents like name, address information, etc and store all in a central database and issuance of a unique identity number called Aadhaar to every resident.
Aadhaar will subsequently form the elementary, universal individuality infrastructure on which both governments, as well as non- government service providers all over the country, can shape their identification tools.
What is an Aadhaar Card?
Aadhaar Card is a unique identity number issued to Indian citizens by the Unique Identification Authority of India or UIDAI. It is a 12-digit unique numeric identification and is exclusive for each Aadhaar cardholder. The specialty of this card is that it comprises the demographic and biometric information of the individual and is used for several authentication purposes. An Aadhaar card is issued free of cost and you can voluntarily apply to enrol yourself for Aadhaar.
Why do you Need to do an Aadhaar Card Update?
After you enrol yourself for an Aadhaar and after you receive the same, you may notice that few details in the card are wrongly captured, and therefore need a correction or an update, in case there is any change in your address, etc. Also, life-changing events like marriage may lead to changing the basic demographic details like name and address. Your address and mobile number may also need a change if you are shifting to a different place. You may also want changes in the details of your relatives for some important changes like marriage, death of a relative etc. Additionally, you might have personal reasons and may want to change your mobile number, email address etc. UIDAI provides the facility of aadhaar card correction and aadhaar card update whereby you will be permitted to change or update your aadhaar details. UIDAI has given this facility to make corrections or updates in your Aadhaar card both online and offline. You can correct any error or update any of your data in your Aadhaar record by filling up the Aadhaar card update/ correction form. No need for you to incur any expense for doing this if you are doing any update or change within 96 hours or 4 days from the enrolment date. But, after 4 days, you need to pay an insignificant charge of INR 50 for any update or change request.
Here we will take you through the process of aadhaar card update in detail.
Modes of Aadhaar Card Update – Online & Offline
There are two different ways you can get your details updated: –
- Online: Using Self Service Update Portal or SSUP. Visit UIDAI official website –https://ssup.uidai.gov.in/ssup/and you can update.
You can use SSUP Portal for Aadhaar card update, only for one aspect of your demographic details and that is your address with necessary supporting documents. An important point to note here is your mobile number needs to be registered in Aadhaar while you are using SSUP service.
- Offline: You can do an Aadhaar card update or aadhaar card correction by Visiting the Permanent Enrolment centre. You can search for the nearest enrolment centre by visiting the UIDAI website link- https://appointments.uidai.gov.in/easearch.aspx?AspxAutoDetectCookieSupport=1and get the nearest centre. It’s advisable that you book an appointment and then visit to avoid unnecessary delays and standing in long queues.
Under this method, you can Aadhaar card update or correction of both demographics’ information like your name, address, date of birth, gender, mobile & email and your biometrics data like your fingerprints, iris scan, and photographs. In such scenarios, the evidence is gathered by the officer during the time of receiving the request. UIDAI presently has planned three modes for Supported Updates:
- Update Client Standard or UCS
Fields: All biometric and demographic fields with local language may be updated
Identity Authentication: Back-end Biometric check
Document Verification
- Verification for fields needing documentary proof
- Authentication is completed by the verifier, appointed by the UIDAI or the Registrars present at the Enrolment or the Update Centre
- Verification procedure followed in line with DDSVP Committee Recommendations
Also Read: Update Father’s Name in Aadhaar Card: Complete Guide
Form Filling and Acknowledgement
Done by an officer, responsible for handling language issues, spelling, translation, etc on update client as requested by you as the resident. The officer will give biometric sign off for each update request. You will get an acknowledgment stating the Update Request Number -URN with which you can track your request. This whole process can be shown in the below figure for your better understanding:
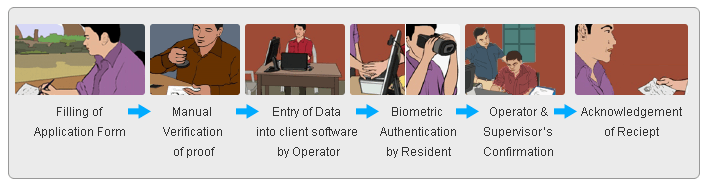
2. Update Client Lite or UCLFields: All demographic fields with Photo with local language may be updated
Identity Authentication: Biometric Confirmation of the resident
Document Verification: Similar as mentioned under UCS as above
Form Filling and Acknowledgement: Similar as mentioned under UCS as above
3. Update through AUA-Authentication User Agency Point of Presence
To be used by a selected Registrar who will act as AUA’s to whom UIDAI may provide an application for Update. The Registrars are known to collect or create or own the exact demographic field and is a custodian of all data.
Fields: Demographic fields
Identity Authentication: Your Biometric Authentication on the AUA device; UIDAI may choose to use further authentication factors if required. For example, OTP is being sent to the mobile, for accepting the update requests under this technique.
Document Verification: UIDAI will accept the request for the update on the basis of the Registrar’s confirmation process and your authentication as a resident.
Form Filling and Acknowledgement
This practice will be started by the registrar’s operator on an explicit device that comprises a biometric authentication feature or Micro-ATM. The acknowledgment receipt can be a printout or an SMS or an email based on the type of request.
Steps Involved in Aadhaar Card Update via Online and Offline Mode
- ONLINE In this section, we will discuss the steps for doing an aadhaar card updateYou can follow the below-mentioned steps when you are using the SSUP portal as mentioned above to do aadhaar card address change online with and even without any proof of address documents. Let us both in details as below:
- Address Change with Valid Documents
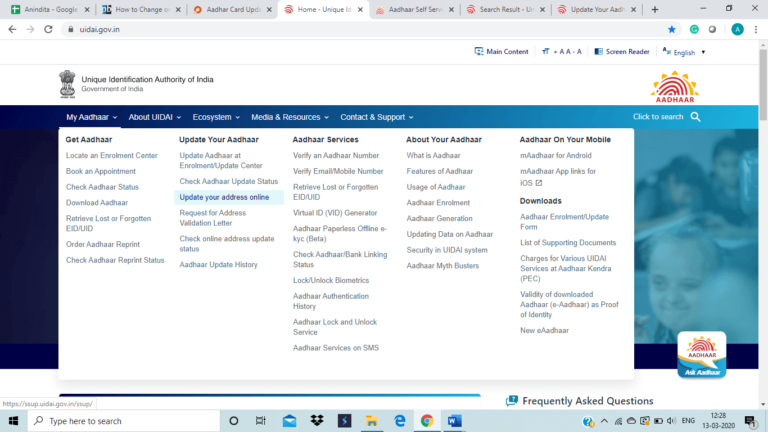
Step 1: Visit UIDAI official website https://uidai.gov.in/and select on “Update your address online” below “Update your Aadhaar” under “My Aadhaar” from the homepage
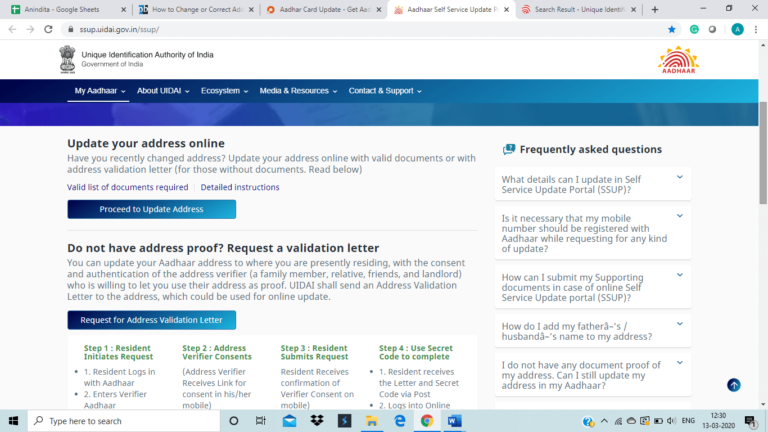
Step 2: A new page will appear as shown below and you need to click on “Proceed to Address”
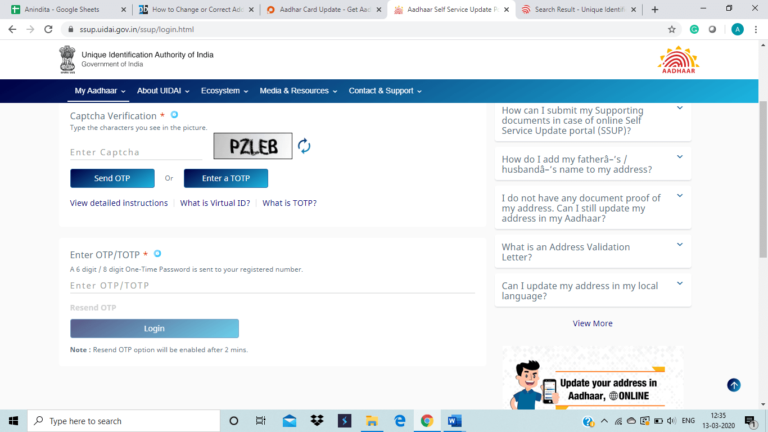
Step 3: Enter your Aadhaar number or your VID -Virtual Id number and do the captcha verification process
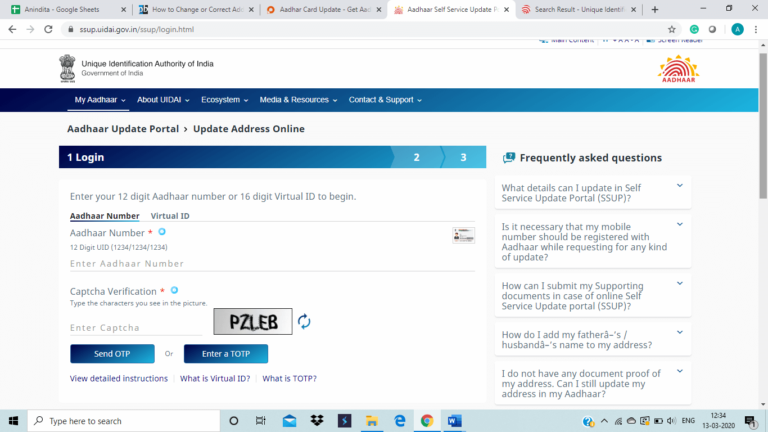
Step 4: Enter your Aadhaar number or your VID -Virtual Id number and the captcha verification code and request for an OTP. After receiving the OTP in your registered cell number, fill the OTP and click on the “Login” button
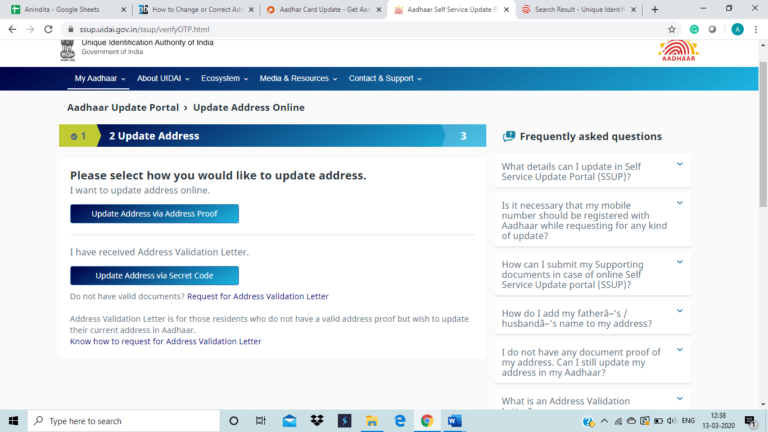
Step 5: A separate page will be displayed with options “Update Address via Address Proof” and “Update Address via Secret Code”. The first option is related in case you are having valid documents of address proof, and the second option will be relevant, where you do not possess any address proof and requested for an “ Address Validation Letter” that is sent to a verifier who confirms your address on behalf of you and the letter will consist of a secret code for authentication. We will discuss the second scenario in detail after this
Step 6: Update or change your address details
Step 7: Attach the coloured scan of your address proof as per the valid list of documents. Check the data that you have filled in for accuracy in English, with the local language. UIDAI will not do any corrections to your data
Step 8: Submit your request for aadhaar card address change. Note your Update Request Number- URN for you to track the request. You can also download or print the copy of your acknowledgment
2. Address Change without Valid Documents
Follow the below steps for aadhaar card address change online via Address Validation Letter Request when you are not having any address proof documents:
Step 1: Initiate the request
- Log in with Aadhaar in the UIDAI website as mentioned above
- Enter the Aadhaar of the Verifier
- You will get an SRN- Service Request Number
Step 2: Permission from the Address Verifier, when he gets the applicable link for his or her permit in his or her mobile
- Verifier clicks on the link given
- Verifier logs in with his or her Aadhaar
- Verifier gives his or her permission
Step 3: Submit the request after you receive a confirmation for the go-ahead given by the verifier
- Log in with the given SRN
- Check the Address
- Edit Local Language, if required
- Submit your request
Step 4: Submission of Secret Code
- You get the Address Validation Letter with the Secret Code via post
- Log into the SSUP Portal
- Update your Address via the Secret Code
- Check your new address and submit your final request
- You will get a URN for checking the status in future
2. OFFLINE
As mentioned above, you can do aadhaar card correction in both demographics’ information as well as your biometrics data like your fingerprints, iris scan, and photographs. The demographics update will include the below:
- Name
- Address
- Date of birth
- Gender
- Mobile
- Email Address
You can get your aadhaar card correction done by visiting the Permanent Enrolment Centre- PEC or Aadhaar Seva Kendra – ASK tool. Here are the steps below to do so:
- Download the form from the official website of UIDAI https://uidai.gov.in/images/UpdateRequestFormV5.pdf
- Fill the Aadhaar correction form carefully
- Enter the correct information
- Carry your self-attested copies of the supporting documents as per the valid list
- Visit your nearest PEC or ASK centre which you also locate from the link-https://appointments.uidai.gov.in/easearch.aspx. You can also fix an appointment as mentioned above
- Submit the form along with documents to the officer
- You need to pay INR 50 for the aadhaar card correction request
Steps for changing the name in aadhaar & the documents required
You can get your incorrect names corrected in your Aadhaar. This facility is beneficial for people who may have dissimilar names in their PAN and Aadhaar thereby not able to link the two documents. If you want to change your name in Aadhaar, you need to visit the Aadhaar Enrolment/Update Centre and follow the below steps:
Step 1: Fill the Aadhaar Enrolment/Correction Form carefully
Step 2: State your correct name in the form
Step 3: Submit the form with the appropriate Proof of Identity -PoI
Step 4: The officer will register your aadhaar card correction request
Step 5: You will receive an acknowledgment receipt for the update request
Step 6: You need to pay INR 50 to avail this facility
Documents required for a name change: You can refer https://uidai.gov.in/images/commdoc/valid_documents_list.pdf for a complete list of POI documents as there are 32 PoI approved documents as per UIDAI list. However, certain main POI docs are mentioned as below:
- Passport
- Voter ID
- PAN Card
- Driving License
- Ration or PDS Photo Card
- Government Photo ID Cards or Service photo identity card issued by PSU
- NREGS Job Card
- Photo ID issued by Recognized Educational Institution
- Photo Bank ATM
Steps for changing the address in aadhaar & the documents required
The online and offline method of aadhaar card correction for an address change is mentioned in detail as above. You can use the SSUP portal to change the address change online and you can visit any PEC or ASK for offline address change.
Documents required for address change: You can refer https://uidai.gov.in/images/commdoc/valid_documents_list.pdf for a complete list of POA documents as there are 45 PoI permitted documents as per UIDAI list. However, certain main POA docs are mentioned as below:
- Passport
- Bank Statement or Passbook
- Ration Card
- Voter ID
- Post Office Account Statement or Passbook
- Government Photo ID Cards or Service photo identity card issued by PSU
- Driving License
- Electricity Bill *
- Water Bill *
- Telephone Landline Bill *
- Property Tax Receipt (not more than 1 year)
- A letter signed from Bank Letterhead with photo
- Signed Letter on letterhead with Photo issued by registered Company
* Less than 3 months
Steps for changing the mobile number in aadhaar & the documents required
UIDAI has provided the facility to do aadhaar card correction and update your mobile number. Follow the below steps to change your cell number in Aadhaar records:
Step 1: Visit the nearest Aadhaar Enrolment Centre and follow the method of locating the same as explained above
Step 2: Fill up the Aadhaar Update or Correction form stating your new mobile number
Step 3: Submit the form to the Aadhaar officer
Step 4: Pay a nominal fee of INR 50 for the service
Step 5: An acknowledgment slip will be given to you with Update Request Number or URN
Step 6: You can use the URN to track the status of your request
Step 7: Your mobile number will be updated in the Aadhaar’s database within 90 days
Documents required for mobile number change
For doing an aadhaar card correction for mobile number, you do not need any document.
Steps for changing the date of birth in aadhaar & the documents required
Step 1: Visit the nearest Aadhaar Enrolment Centre and follow the method of locating the same as explained above
Step 2: Fill up the Aadhaar Update or Correction form stating your correct date of birth
Step 3: Submit the form to the Aadhaar officer with valid proof
Step 4: Pay a nominal fee of INR 50 for the service
Step 5: An acknowledgment will be given to you with Update Request Number or URN
Step 6: You can use the URN to track the status of your request
Step 7: Your date of birth will be updated in the Aadhaar’s database within 90 days
Documents required for address change: You can refer https://uidai.gov.in/images/commdoc/valid_documents_list.pdf for a complete list of DOB documents as there are 15 DOB permitted documents as per UIDAI list. However, certain main DOB docs are mentioned as below:
- Passport
- Birth Certificate
- PAN Card
- SSLC Book/ Certificate
- A certificate on UIDAI format or ID Card having photo and Date of Birth or DOB duly signed and issued by a Government authority
- Photo ID card with Date of Birth, issued by Recognized Educational Institution
- Certificate of Date of Birth issued by Group A Gazetted Officer on UIDAI format
Things to remember while doing aadhaar card correction
You need to remember certain Do’s and Don’ts for doing aadhaar card correction
You Must Do
- Use capital letters while filling Aadhaar card correction form
- Submit the right proof for any change or update
- Link your mobile number with your Aadhaar and then place a request for correction
- Fields needed correction only requires to be filled up
- If you do not have the original documents with you for authentication, all the photocopies need to be certified by a gazetted officer or a public notarized officer
- Provide full and accurate details of your address, as the address will be used to send your Aadhaar card and all other important communications
- Use any language to fill up the details on the Aadhaar enrolment form and not necessarily the local language
You Must Not Do
- Do not give inappropriate or untrue information
- Do not give old data irrationally
- Always give updated data in your Aadhaar card correction form
- Do not use initials like M.K. Sinha, instead, write as Mohan Kumar Sinha
- Never attach an unclear photo
- Do not use greetings like Mr./Mrs./ Dr./ Col., etc.
Important points to remember for Aadhaar card correction
- You as an aadhaar holder can only request for any update and no one else can give such request, except for child below 5 years
- Any aadhaar update needs authentication by the aadhaar holder. This authentication is performed either by OTP verification or biometric authentication. For child below 5 years, the authentication will be done by his or her parents or guardians
- In case your update request gets rejected, you can call at 1947 to know the proper reason and therefore can do the needful accordingly
- If your aadhaar states as “Invalid”, you can call 1947 for further assistance
- There is a limit on the number of updates which is as per the UIDAI guidelines and below is a quick view of the same. Also note that there are no limits set on the number of updates in like address, email address, mobile number, fingerprints, iris scans or photographs
- Name update- Only Twice – Check information on how to change/update name in aadhar
- Gender Update- Only once
- Date of Birth- Only Once
UIDAI has provided all necessary infrastructure and facilities to do Aadhaar card correction, hence it is our responsibility to ensure that we are keeping our details updated in aadhaar and be a responsible citizen.
Related Articles:
- How to Download Aadhar Card Using Mobile Number
- How to Change/Update Name in Aadhar Card After Marriage
- Booking an Aadhaar Enrolment Appointment Online
- How to lock/unlock Aadhaar biometric data
FAQ’s
Filling father’s name or husband’s name is voluntary. Details of relationships are a segment of the address section in the Aadhaar enrolment form and are standardized to Care Of or C/o.
No, your Aadhaar number will remain the same after any update.
Yes, you will be able to download your e-Aadhaar-a soft copy of your aadhaar, online after your request is accepted. You may download your e-Aadhaar by clicking “Download Aadhaar” on the UIDAI official website.
No, you may visit any of the permanent enrolment centres for any update.
No, for all biometric updates which include your photograph as well, you need to personally visit any nearest Aadhaar Permanent Enrolment centre.

